Monday, November 29, 2010

Shutter Headboard

Easy as one, two, three...

I looked on craigslist for four shutters and paid $20 for these. I washed them down and spray painted them the colors that I wanted in my spare bedroom. It really is THAT easy!


This room is not finished. I plan to get or paint old night stands white. Place a nice country themed lamp on them and also add more pillows. I originally wanted a yellow quilt with a little green in it but this quilt will have to do for now. :) Here is the original picture that I got the idea from. It would be cuter if the headboards were wooden so that you could make them more rustic looking. 

From frumpy to Fashionable


This shirt was given to me by my older sister. She purchased it online from Maurices and she didn't like the way it fit her. I tried it on and also didn't like the way it fit me. The front used to be a dipped neck so whenever I were to bend over, the ladies would be hanging out. What I did was cut the front of this shirt and turned it into a fashionable slip on cover-up. 


Moral of this story... before throwing out any clothes. Take a good look at some fashion magazines and you clothes and see if you can change them up. As simple as cutting. 


Sunday, October 3, 2010

Share some Love...


Similar to the previous posting, you can do this at any event. We put this together for my Husband's Grandma's 80th birthday. I had her mail me some favorite older photos and chose this one to put in the frame. Have guests sign the frame saying Happy Birthday or whatever they want. Josh and I had this done at our wedding instead of a guest book and we love it to this day. It is especially cute when little children sign their names on it for Grandma or whoever. You can find these frames at Micheals, almost any crafts store or it would be real easy to put it together yourself. :) Enjoy!!

Write a Story....

Anyone can do this at any event such as a birthday, wedding, baby shower, and so fourth. Put together an album with cute scrapbook paper and place solid color matte paper on those pages for a place to write. Slip them into an album and write a sign for people to read that explains to guests to write a story about the bride and or groom, the birthday boy or girl, for a baby shower you could do pieces of advise, or baby stories. Again this can work for almost any event.
 I made this recently for my husbands grandmas 80th birthday. I bought scrapbook paper with fun antique designs on it such as a old keys, mystical mermaids, corsets, men in old time bathing suits, and old newspapers. It turned out great once people gave us stories. To fill in blank spots I put pictures instead. It is a great gift to give and a fun on too.

Friday, September 24, 2010

New Art-Piece


This looks like it is a hard art piece to make but really it took less than an hour. All you need is paint, paint brushes and a sponge. I sponged the paint with a little bit of water and started to put color on the canvas just as the picture is shown. I used a darker color for the corners. As for the branches just start drawing branches, lines really, how easy is that? Then the birds are in the shape of a heart but with pointy tails. The flowers are just streaks of red paint. This really was an easy project. I made this for my sister for her birthday. Now I want one for myself. :)

Tuesday, July 13, 2010

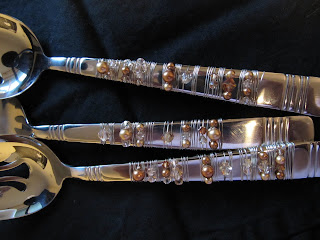
Decorative Silverware


All you need is nice looking silverware, crystal beads and some wire! SO EASY! and VERY cute! Great gifts for newly weds or even friends or family. This was a fun craft to do! Enjoy!

P.S Make sure your wire fits through your beads.

Saturday, May 22, 2010

Braid a Scarf


So Cute and So Easy! Here are the steps to How to Braid a Scarf from which I learned in Israel.

Step One: Tie a basic knot, leave enough room to slip the hole around your head.


Step Two: Turn your knot as seen in the picture. See three parts of the scarf you can braid with. The first is by my left thumb. The second is the middle part which is touching my left middle finger and the third part my right thumb is touching. With these three parts, start braiding.


Step Three: let the ends of the braid fall loose, throw it over your head and have the braided side on your left or right side. Beautiful!


Wednesday, April 14, 2010

Newly Weds Love Buckets


I have a friend getting married this month and anyone that knows me knows that I hate just buying a gift, but I love making a gift more personal. For this couple I made what I call Love buckets. One is titles "her" and the other "him." The man picks from the "him" one and she picks from "her"s. In these buckets you will find folded pieces of paper. On these pieces of paper are thoughtful things you can do for or with your new spouse. You can pick on each day or whenever you cant think of something sweet to do for him/her. There are ideas anywhere from "Go for a walk" to "draw a hot bubble bath for her, light some candles and turn on some music."

All you need to make these are cans (see through), your choice of scrapbook paper, hot glue gun, sticky letter and ribbon. Wrap the paper around the cans, place your letters, and decorate with ribbon. SUPER SIMPLE! Be creative for gifts to someone you love.

Monday, March 8, 2010

Horse Sticks for Kids


For Christmas I made horse sticks for our nieces and nephew. I made the girls' horses with white and pink and for Ethan, with brown and white. I actually got the directions to make this online.

http://createeveryday.blogspot.com/2008/11/make-your-own-hobby-horse-stick-pony.html

Here is Shaylee with her Horse on a Stick. This was a fun gift to make and I wish I would have had one when I was little. My Grandma used to put a paper sac on the end of a broom stick and then we would draw a horse face, then my little sister and I would prance around Grandmas house and play!

Make your own Art


I made this piece of artwork when in the Graphic Design program here in Salem. All you need is an outline of something such as a dancer, a face, an animal, a scene or whatever it may be. This picture I took of my sister then, contrasted it lots on a photo editor. It came out like an outline and then I applied it to this piece.

First paint your canvas to you liking of a color. I used black so that my color and writing would stand out more.

Second, write on the canvas. Write whatever comes to mind, a prayer, a poem, something from a book, whatever it may be. Make sure your font of writing correlates with your art piece. Whether it is bulky, soft, italic, just make sure it fits. I wrote with a gold pen so that it stayed and stood out.

Third, outline your image onto the canvas with pencil lightly. What I did was used carbon paper to transfer the image. If you need help with this let me know and I can explain in more detail. Then after tracing image, tear up your choice of scrapbook paper and start gluing inside your outline. I also put cut out flowers, birds and drew on designs like swirls and such with a black permanent marker.

This is such an easy piece of artwork that can be done. Don't let the picture scare you but challenge you. Let me know if you need any help doing this. Have fun with your creative hands.

Pumpkin Cake


OH! This was SOO much fun to make and EAT! I went to my Grandma and Grandpa's this last halloween and we make a Pumpkin Cake.

All you Need:
two orange colored Bunt cakes
Frosting or a flavored whipped cream (thick)
Gummy spiders
Stringy black licorice (I have found at Dollar Tree)

Basically follow the picture above. To make the stem, we put black licorice together and tight it with another string of black licorice then draped licorice along the side and then placed spiders as wanted. This was a delicious and fun dessert for halloween.

Kids Beach Buckets


Last year, Josh's family game to Oregon and we spent the weekend at Pacific City. For this trip I wanted to make something fun for our nieces and nephew since we only get to see them maybe twice a year. For the beach I bought some beach buckets, got a hold of some vinyl from my mom though you can buy this at walmart, or Office Max. I cute out their names and placed them on the buckets so they had their own buckets with their name on it. Then I shopped around and bought beach towels with specific cartoons on them for each niece and nephew, like Batman, Dora, Tinker Bell and Barbie.


I also added a couple of fun toys in there for them, like a huge bubble stick. You can add more beach toys such as shovel, or shapes to form sand in. This was fun for them and also for me.

Bridal Shower Underwear Game


Last year, one of my best friends got married. Therefore, we had a bridal shower for her and played some fun games. One game that we came up with was the Underwear Game. The invitations that are sent out tell guests to buy a single item of underwear for the bride to be, but have it represent you, the guest.

Place a small bag outside of the front door of the party house and with it a sign that explains, "Please put the unmentionables you brought for (Bride's Name) here."When it comes time when everyone is there, take the bag and then clip the underwear on a clothes line in the room to show off the brides new undies.


Now for the game part! The bride needs to guess which pair of underwear came from which guest. As I said before, thats why the underwear has to represent you to help the bride. This was a fun game and tricky on the Bride.

My three best friends and I are known as the WEASels. It is the first letter of our maiden names with els at the end which by accident we found out means God. We have had this name since high school. That is why I put WEASEL BOOTY on my underwear for Hannah! Try this game out, it is a kick in the pants and fun for everyone!

How to Cure a Hangover 21st Birthday Basket


When my little sister turned 21, my older sister and I put together a "How to Cure a Hangover" basket as a joke. Along with everything in the basket I wrote a little something that explained what everything was for. This was  a funny and fun gift to give.

What's in the basket:


  1. Drink plenty of water to re-hydrate
  2. Eat a snack to get something other than alcohol in your system
  3. Pop some pills for that headache, achy body and/or from any other wild activities that caused pain.
  4. Drink an energy drink to refuel from a night of hard core partying and little or no sleep. 
  5. If you think you are going to blow chunks...Don’t forget your cozy toilet pillow, cause you may be there for a while. (Note: Pillow is not vomit repellant) If you can’t make it to a toilet, feel free to just use this very own basket. (Note: Don’t forget to remove items in basket before throwing up in it)
  6. After vomiting, wash mouth and face with washcloth. 
  7. Don’t forget to rinse mouth with refreshing mouth wash.
  8. Throw a stick of gum in your mouth to prevent vomit AND alcohol breath. 
  9. And for those nights that you get crazy...well, thats what the condoms are for. 
  10. To repeat cycle drink more alcohol

Corn on the Cob Cupcakes

I want to eat one of these while looking at the picture! These cupcakes are from a fun cupcake book I have.  They are fun to make and a kick when people see them. :)

What you need:
Cupcakes (any kind)
Frosting
Yellow food coloring
Small Laffy Taffy candy Yellow
I dont remember what they are called but the Corn holders to help hold corn while eating it.
Popcorn flavored jelly beans
Peach flavored jelly beans
coconut flavored jelly beans

Basically, follow the picture above. Make yellow frosting, frost cupcakes, place jelly beans in a random color order but make sure they are lined up the way I did. Put three cupcakes in a line to create the "corn." Cut laffy taffy so it looks like butter and place the corn holders on ends and Enjoy!

Sunday, March 7, 2010

Welcome to Krissa's Creative Hands

I decided to create a new website which shares my creative lifestyle. Things that I have painted, sewn, created, or dreamt. Come and join that crafty side with me!